Pages

Saturday, April 27, 2013

Tools: Evernote for Crafters

Hello Friends!
 
This is my second post about Evernote. I am having a love affair with this App! It is wonderful for business, family life, and my hobbies. However, this post is strictly about the many ways I have made Evernote work for me in (and out of) my craftroom.

What have I got?
  • Keep inventory of your inks and markers, or anything else. I have a list of the markers and inks that I have in my stash so I can access it on the go. I also have a list of my Cricut cartridges. I also keep track the CTMH inventory I have for sale.
It's a great resource when inspiration hits and you are away from your craftroom.
  • Keep a to-do list of all the project ideas you want to do. Not all my projects are scrapbook related, but they are craft related. So I have a separate folder for my 3D projects, cards, or home decor ideas.
  • Pages you wanna scrap. You can jot down any idea for a title of a page or a kind of page you want to scrapbook. If you keep them all in the same place then you won't have to wonder where you wrote it down.
  • Journaling, quotes, and stories that you know you will otherwise forget. My children's moments are fleeting and there are so many things I want to add to their books. Since, I can access this on my phone I can quickly type in the story or the cute thing they just said.
  • Wish List. If you are anything like me the list is long and extensive. So keep it here and you have it on the go for those last minute shopping trips!
  • Log ideas for blogging topics (if you blog). Inspiration can hit anywhere, this way I can keep track of my ideas in the same location no matter where I am.
Excellent for info you want to clip from the web that isn't a picture (Pinterest):
  • Tips and Techniques. Sometimes you find tips and techniques that are videos or more written word than images. You can clip the URL or the whole page to Evernote for future access. You can also forward an email using your Evernote email address.
  • Keep a list of all products you learn about that you wanna try. I keep this separate from my wish list, because it can be a type of something rather than a specific item. It can also be more detailed with notes, rather than a list of "must haves".
What can you add to this list? Of course I focused only on the uses for crafting and not all the other uses for business and home, which are endless.

My original post, Tools: Secret to Digitally Organize Your Stamps. will show you another great feature and might inspire you to use Evernote in a new way.

Please Share, Tweet, and Pin It!
Your comments are always welcome! Please let me know if this has inspired you or if you can add a new item to the list. I would love to know if I am missing an opportunity!

April Specials
 
 
You can get this stamp set for only $5 ($17.95 value) with a qualifying purchase of $50.
Shop with me here ===> Emily's Close To My Heart Shop
 
 Thanks for reading!

Friday, April 26, 2013

Cards: Baby Announcement

Hello Friends!
 
Today I am sharing my daughter's birth announcement. I just had to make her announcements! Although, with a toddler too, I needed them to be fairly easy to assemble. So I added the banner, her name and birth info straight onto the photo using Photoshop Elements. This saved a lot of time instead of stamping every single one.

I wanted to add a cluster to the top right and I did that by adding three elements. I cut out the frame using the Art Philosophy Cricut Cartridge and stamped on it using the Frame Flair Stamp Set. Next I made the heart using a silver cardstock and a heart shaped punch and drew stitches around the edge to give it definition. I stamped the "I made this" accent and cut it out using micro tip scissors. I had to use that stamp! It was just so perfect...I made the announcement and the baby!!!

When I was ready to assemble I glued the photo to the black photo mat, folded the frame piece off center so that there is more on the back side, and glued the rest of the embellishments on top. I also added a staple to the edge of the frame to finish it off.

Since I used a black mat, I added a brief mention of the happy parents and older brother on the rest of the frame on the backside.

And there you have it, a relatively simple but lovely handmade baby announcement. You can easily use this sketch for a multiple of purposes. It would make a great Thank You card from a Bride and Groom, an invitation, Save the Date, and so on.

Please share, tweet, and Pin It!

Have you ever made announcements or invitations? Did this inspire you to do so? I would love to hear all of your comments, so please use the comment box below!

 
 April Special
 

You can get this stamp set for only $5 (17.95 value) with a qualifying purchase of $50.
 
Shop with me here ===>Emily's Close To My Heart Shop
 
Thanks for reading!


Wednesday, April 24, 2013

Cards: Have a Blast Birthday

 
I made this card for one of my best girlfriend's birthday. She is a fun and free spirit so I enjoyed making a playful card for her. However, I love this card because it could really be a fun card for a woman, man or child. All you would need to do is adjust the front statement to say "Birthday" or "3rd" instead of "30th". 
 
I used the Just Because Cricut Cartridge for the card shape and the rocket ship. I then found a frame cut that I liked, stamped "HOPE YOUR", "IS A", and "2012" with Tiny Typewriter stamp set.
 
I inked the Close To My Heart chipboard stars with Sunny Yellow ink and then added clear stickles to make them shine. I did some pen work on the rocket ship, white dots, and black outlines in the window to give it a finished look.
 
 
Hope this inspired you to make a fun card even for an adult!!
 
Please share, tweet, and Pin it! Also all your comments are welcome. Please let me know how this card inspired you.   
 
April Special


Get this stamp set for only $5 ($17.95 value) with a qualifying purchase of $50.
Shop with me here ==> Emily's Close To My Heart Shop
 
Thanks for reading!
Have a wonderful day!


Thursday, April 11, 2013

Project Series: Mini Album Part 2


The purpose of this post is to show you a project I created and at the same time use it to teach various techniques and highlight Close To My Heart products. Please take these techniques and apply them to any project, card, or layout of your choice!
This is part 2 of a 6 part series:
  • Part 1: Front & Back Cover
  • Part 2: Pages 2 & 3
  • Part 3: Pages 4 & 5
  • Part 4: Pages 6 & 7
  • Part 5: Pages 8 & 9
  • Part 6: Pages 10 & 11
Page 2
On this page I wanted to show another way to cover the chipboard without inking it completely. I used the script stamp from our universal backgrounds stamp set. It works perfect with the Typeset paper pack and many others. It is also great to make your own pattern paper.  The stamp is 3x3 inches so you have to line it up and stamp it a few times. Our stamps are clear and they are made to line up perfectly. In addition, our blocks are clear making it so easy to line it up exactly where you need it!
Tip:
I knew that I was going to cover the center of the page with another piece of paper, therefore, I made sure the edges were perfect lined up but the center didn’t have to match. In fact there is a whole gap in the center of my page that I didn’t stamp, but since it is covered, no one is the wiser!

The stamp makes it looks like I have a special background paper! I inked the edges of my cardstock and attached it to my page. For the journaling spot, I used our April 2012 Stamp of the Month.  I used the lined stamp that can also be used for backgrounds or to give a detail to cardstock. For this project I used it to make journaling lines. I finished the page off with some embellishments and a personal sentiment from me.
Page 3
For the third page I wanted to cover the entire page with paper. I chose my papers and attached the black typeset print and the orange cardstock. I trimmed the black typeset print with my CTMH micro scissors and finished it with finishing files for a smooth edge. I then added the black cardstock strip and used a black pen and ruler to draw some subtle lines for future journaling. For embellishments I added a chipboard dimensional that I inked with Bamboo ink and then stamped “Our Vacation” on top.

I hope you enjoyed this post in the mini-album series. Did you learn a new technique? I would love to hear your comments! Please share, tweet and Pin It.
 
Like what you see? Shop with me here=> Emily's Close To My Heart Shop

Thanks for reading!


Wednesday, April 10, 2013

Tools: Secret to Digitally Organize your Stamps


Do you get bogged down searching for tools and products when you are scrapbooking?
I have tons of stamps! I was so frustrated wasting time searching my stash for the perfect stamp or stamps until I realized I have the perfect solution -- Evernote.

I have been using Evernote, a program linking your computer and devices, for so many things. It store notes, images, to-do lists, etc. I use it for recipes, business stuff, household stuff and now my stamps.

One of Evernote's highlights is that it makes photographs a searchable document. This means that it can read words within the image, whether handwritten or typed. So, this gave me the idea that I could take a picture of each one of my sets of stamps, upload it to Evernote and add some tags. Now whenever I need a specific sentiment or image I can search for that term and find my options.

Example:
Say while making a card or scrapbook layout I wanted a butterfly and the word Love. Since, I have added all my stamps to Evernote I can search for those two words. Evernote will quickly scan all of my stamps looking for the word Love and also include any that I have tagged with "love". Then I will do the same for butterfly. It will find only the stamps I have tagged with "butterfly". Now I have a selection of stamps that fits my needs for this project. Because I was thorough when tagging, I know that I haven't missed anything like I easily could when physically searching through my stash. Since I am looking at images of the stamps, I can quickly choose which one I want. I have the name and number so I can go find it easily.

Here are the steps you can follow to upload your images to Evernote. You can do this for ANY image.

Easy Steps:
  1. Take a picture of your stamp set(s) with your smart phone or camera. If you do it with your smart phone you can upload it instantly without transfering it to your computer.
  2. Login into Evernote, create a folder named Stamps, and create a new note for each stamp set.
  3. Give it a name, preferably the stamp name or something descriptive. I use the Close To My Heart stamp name and product number.
  4. Add tags. Tags are keywords you use to search. Be thorough!! The more tags you use the better your search results will be. Remember the example above. 
  5. Rinse and Repeat (Haha, just had to use it). 
Now you will have a digital library of all your stamps and can just type in what you are looking for instead of having to physically search through all of your stamps.

How else can you use Evernote for your crafting needs? Please leave a comment!

Please share, tweet, and Pin It!

 The April Stamp of the Month is only $5 with a $50 purchase.
Works with the Artiste Cricut Cartridge
 
Shop with me here===>Emily's Close To My Heart Shop
 
Thanks for joining me! 


Tuesday, April 9, 2013

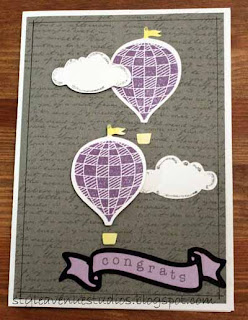
Cards: Hot Air Balloon Congrats

 
Hello Friends!
I have a beautiful, simple Congrats card. I love this one because it can be used for any reason. You can even make the sentiment something else. I used this one for my friend's baby shower. She is having twin girls so I used two hot air balloons and two clouds. I used white, black and lavender because that was her shower theme.
 
 
I made this 5x7 card with white cardstock. I cut the gray cardstock at 4 3/4" x 6 3/4". From the Universal Background stamp set I used the script stamp and grey wool ink pad to create a subtle patterned paper. Next, I cut the hot air balloons, clouds and banner all from the Artiste Cricut cartridge. The hot air balloons were cut at 2 3/4" as per the April stamp of the month set. The clouds and the banner were cut at 1".  I stamped the balloons using the Gypsy ink pad and then colored in the flag and the basket with Sunny Yellow using a blending pen. 
 
*A blending pen picks up the ink and allows you to paint it onto your stamped image. It is not for detailed drawing or lots of coloring, but it is absolutely great for small areas!
 
Stamping TIP:
Stamping with clear stamps is so easy and versatile. This tip will show you why! I didn't have a "congrats" stamp that fit perfectly in my banner. Instead I used individual letter stamps to create one. I placed each letter on the banner face down, the same way I would stamp. I adjusted them to make sure the word fit within the given space. Once I had them lined up I took my clear block and placed it over the stamps to adhere them to the block. Now I have a "congrats" stamp that fits my banner perfectly!
 
I attached everything to the card base, drew lines around all 4 edges of the gray background, applied foam tape to one balloon and one cloud giving them dimension and then added silver Stickles to the clouds. Voila! A beautiful congrats card that can be used for any occasion.
 
Supplies:

April Stamp of The Month
Artiste Cricut Cartridge
Silver Stickles
Tiny Typewriter Alphabet Stamp Set
Universal Background Stamp Set
Gypsy, Grey Wool, Sunny Yellow ink pads
 
 April Stamp of The Month
This set is only $5 ($17.95 value) with a $50 purchase.
Shop with me here ===>Emily's Close To My Heart Shop
 
Thanks for reading! Please share, tweet, and pin this post if you enjoyed it. Just hover your icon over the image and a Pin It button will appear. Also, all comments are welcomed with open arms!


Monday, April 8, 2013

How To Make a Diaper Cake

Hello Friends!
My best friend is having twins! I just attended her baby shower and decided to make her a diaper cake. She is going to need all the diapers she can get. So I decided to write a post about how I put it together. You can make a diaper cake with any size diapers you want. I used newborn diapers for this cake.
Supplies:
67 Newborn Diapers
Rubber Bands
Glue Dots
Ribbon (2" and 1/2")
Hot glue and glue gun
Cardstock
Pearl Sewing Pins

 
How To Steps:
 
1. Start by rolling up the diapers and rubber band them together. The top tier has 7, middle has 20, and the bottom has 40 diapers.
 
 
2. Cut your ribbon to fit the circumference of the tier plus 2". Place two glue dots on the backside of  ribbon and fold it over to create a simple hem.


3. Once you have created your hem add two more glue dots and wrap your ribbon around the middle of the tier. Repeat this step for all three (or more) tiers and if you add additional ribbons.
 
 
4. Cut 3D paper flowers with the Cricut and the Art Philosophy Cricut Cartridge. I cut 3 flower styles in multiple sizes (2 1/2", 3", 4", and 5"). I also cut them in two colors of lavender cardstock.
 
5. Ink the edges of the lighter lavender cardstock to give it more definition. Then curl them using a quilling tool and hot glue for a stronger hold.   
 
6. Attach them to the diaper cake using pearl sewing pins. This adds a beautiful touch to the flowers and makes them easy to remove from the cake.
 
Here is another view of the cake.


April Stamp of The Month

 
You can get this awesome stamp set for only $5 ($17.95 value) with a $50 purchase.
Shop with me here ===>  Emily's Close To My Heart Shop
 
 
Thanks so much for reading! Please comment and let me know what you think of the project! 


Sunday, April 7, 2013

Photo Inspiration

Everyone needs some inspiration, especially those of us who describes ourselves as creative! The creative process is a fickle one. Recently, I found someone that gives me that extra push and a new way to look at things when I need it -- Lain Ehmann from www.Layoutaday.com.

A recent video tip she posted talks about looking at pictures in a whole new way. Instead of scrapbooking the obvious event, Easter or Birthday, we should look at our pictures for another story to tell. This can really open up uses for all those pictures you have already printed and decided not to use for your original purpose. I take multiple pictures in order to make sure I get those couple perfect ones to use on my page. However, I am then at a lost for what to do with all those printed pics that didn't make the cut. Well this is the perfect solution!!

 
This is a photo I took this Easter that I just love!! It is a picture of my son opening an Easter egg during his egg hunt in my mom's backyard. The obvious story is about Easter. This is actually his first egg hunt, since he just turned 2. However, a story I saw as I was looking at it deeper was a reminder of my childhood. My grandmother, my mom's mom, had a great backyard. My brother and I loved to play back there. She had a lemon tree that created a "cave" of sorts. It was the perfect empty space, like a fort, for my brother and I to escape. Seeing this photo reminded me of that backyard. Now, my mother has a backyard with a similar area which means my son has an area at his grandmother's similar to the one I had at mine. This will make a great story to scrap that my children may have never known about. I will also be a great story to add to as time passes and I get more pictures of my children playing in their grandparent's backyard.
 
Check back to see the my finished page!
 
Have you looked at your pictures for a deeper story? I would love to hear about what you found and if this inspired you to change the way you scrapbook. Did it give you a new way to see your photos?Please leave me comments and let me know!
 
April Stamp Of The Month
 
 
This awesome stamp set is only $5 ($17.95 value) with a $50 purchase.
Shop with me here ===> Emily's Close To My Heart Shop
 
 Thanks so much for reading!!


Friday, April 5, 2013

Vital Organization: Cricut Cartridges

Are you getting swamped (in a great and wonderful way) with all your awesome Cricut Cartridges? I know I am! I decided I needed a way to quickly scan the cartridges I own. I created a laminated fan of the cricut cartridges and organized them in groups of fonts and shapes. I use it to get a sense of the kind of cuts each cartridge has, creative inspiration when I am stumped, and to make decisions about fonts.

To do this I photocopied the back of each of my cartridges, cut them out and placed them in the two groups. Some cartridges have both font and shapes but I based it on what was predominant. Once organized I placed them back to back and laminated them using my Your Story Laminating Machine. Then, I placed a sticker labeling them with a letter and number. Font cartridges are labeled F1, F2, F3, etc. Shape Cartridges are labeled S1, S2, etc. Next, I hole punched them in the upper left corner and attached them with a binder ring.

Next, I organized the cartridges, overlays and booklets. I used a sharpie to label the cartridges and placed them into two containers. Next, I attached a sticker to the booklets using the assigned code. I separated the booklets and overlays in a photo box. I have one photo box for each group. 


You can adjust this strategy to how you search your cartridges. Maybe you have more seasonal ones or like to search by style. Also there is nothing stopping you from creating more than two groups.

Please feel free to comment, add suggestions, or tell me how you organize your cartridges! I would love to hear it!

 April Stamp Of The Month
 
 
The April Stamp Set coordinates with our Artiste Cartridge.
You can get this stamp set for only $5 ($17.95 value) with a purchase of $50.  
 
Shop with me here


Thanks for reading!!


Thursday, April 4, 2013

Cards: Twins Baby Shower

Hello Friends!

Did you know that April is National Card and Letter writing month? I didn't until yesterday. However, this adds greatly to my 30 day blogging challenge in which I am participating this month. Every Thursday this month I will showcase a new card design. Then maybe it will inspire you and me to send some snail mail! I know I love receiving mail, don't you?

So let's dig into this one! Since I wrote about my son's baby book yesterday, I thought this one would fit the theme perfectly. A friend of mine recently had twins (one boy, one girl), and I made this card for her baby shower. Here's how I did it:

Today I used the CTMH (Close To My Heart) Art Philosophy cartridge. I can't say enough good things about this cartridge. If you have a cricut, I say it is a must have! I know you think I am biased, being a consultant, but I had to have this cartridge before becoming a consultant. I chose the card design with the brackets as negative space and cut it out at 4 1/2". Next, I stamped the "TWINS" with white ink. Then, I used a "congratulations" stamp and stamped it repeatedly on the brown cardstock using versamark ink. Versamark is a watermark ink and is used to give a subtle background image or for embossing. I used it here to create my own pattern paper. Once I was done stamping I added my embellishments. The hearts are chipboard cut outs. To the hearts I attached pink and green cardstock, drew stitches with a white gel pen around the edges, and glued them above the "I" in twins. I backed the card with blue and lavender cardstock to show through the brackets. Finally, I covered the inside of the card with white cardstock on the top and bottom to give it a more finished look and give me a place to write my well wishes.

It's a pretty simple, but lovely card. I hope I have inspired you to create a handmade card to send off to someone this month. Join me next Thursday for another one!

Products used:
VersaMark Ink
White Gel Pen
Cardstock
 
April Stamp Of The Month
Get this awesome set for only $5 ($17.95 value) with a qualifying $50 purchase.
 
Shop with me here ===> Emily's Close To My Heart Shop
 
 
All your comments are welcome! 
Thanks so much for reading! 


Wednesday, April 3, 2013

Scrapbook Layout: Cereal Killer

 
Hello Friends!
 
I have to start my layout series with one of my favorite layouts ever! It's not because it is the prettiest, perfectly embellished or was some momentous occasion. It's because of the story and my creative nature! This is a layout from my son's baby book. Yes, it's completely uncoventional, but it makes his book special, just like him. He was 5 months old and this was his first time trying solid food, well... rice cereal. I had so many great photos that told the story without words. I wanted to show the story with the images. So I started at the top left and flowed around the page and onto the following page.


I used the arrows as page embellishments, but mostly to direct the view in the order of events. Once I had my plan of how I wanted to lay them out the title struck me! Since it was like a stop-motion movie the play on words "Cereal" vs "Serial" seemed appropiate. I had the perfect stamp set with a film strip and used that to create a border element. I limited the amount of added embellishments because I wanted the pictures to take center stage. Plus, it would have made it too busy.

 
I needed to work through the fact that our wall was red at the time and gave the Cereal Killer title a little more gore than I wanted for a baby book. So I created the embellishments to match the boppy seat he was sitting in. Also I added used white and black to create drama.
 
I hope you enjoyed this layout. My reason for sharing this one in particular is to encourage you to step out your comfort zone when designing our layouts. If I had a belief about what a baby book should include, or has always included then I would not have this gem!

What have you done lately where you stepped out of the box or your comfort zone? Please comment below and share your layouts on my Facebook Fan page: www.facebook.com/EmilyCTMH
 
The products I used and the Cricut cuts: 
-Art Philosophy Cartridge: Journaling block: <Rctngle8> 3", Layer <Rctngle8> 3"
-Making the Grade Cartridge: "Cereal Killer" letters at 1"
-Ribbons & Rosettes Cartridge: Brackets at 2 1/2"
-Going Places Cartridge: Arrows at 1 1/2"
-Take a Picture Stamp Set C1440
-Teal, Black, and White Cardstock
-Black journaling pen for the pen work on the arrows and journaling


April Stamp Of The Month
 
Look for a week long series this month using this stamp set. I hope it will give you some ideas for projects, cards and layouts of your own! I am just loving the hot air balloon right now, so trendy!
 
Only available in April!
This stamp set will be yours for only $5 ($17.95 value) with a purchase of $50.

Like what you see? Shop with me here====> Emily's Close To My Heart Shop
 
Click here for a GIVEAWAY!!
~*~*~*a Rafflecopter giveaway *~*~*~
 
Thanks for stopping by!! Have a great Wednesday!


Tuesday, April 2, 2013

Scrapbooking Tips: How to Start a Baby Book

 
How to Start a Baby Book
 
One of the most exciting moments of my life was the birth of my first child. I knew that I wanted to create his baby book from scratch. I wanted to make sure it was chock full of his special moments, firsts and to document every adorable smile and event. However, those first few months are full of sleepless nights, cuddles and poopy diapers. How am I ever going to get a chance to start his baby book and complete it the way I want?
My solution: complete one (title) page for every month. So when he hit 1 month we took his picture, many pictures and repeated this every month thereafter. When he was 2 months I created the title page for his 1st month and displayed it in a scrapbook frame in the room we spend most of our time. I journaled a few things I wanted to remember and left it up for his entire 2nd month. This way I was experiencing his 2nd month and looking back on his 1st. Plus, I felt that getting at least one page done was a true accomplishment. I did this all the way up to his 6th month when life started to get away from me. However, by the time that he reached 1 year old I have at least 6 pages completed of those months that are just a blur to me now. Now, I can go back and fill in pages based on pictures I have taken and what I want to remember.

Moral of the story: Some is better than none!
 
Oh and dont forget about my GIVEAWAY!!
Click on the link below and enter for 2 Awesome Prizes:
Newsprint Alpha Rub-ons and Quick cards Butterfly stamp.

 
*~*~*~ a Rafflecopter giveaway ~*~*~*
 
April Stamp Of The Month
 
 
This stamp set can be yours for only $5 ($17.95 value) with a qualifying purchase of $50.
Like what you see shop with me here ===> Emily's Close To My Heart Shop
 
 
Thanks for reading! Happy Tuesday!